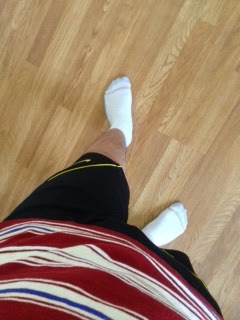
Ready Position
According to Tony Grice, the author of Badminton: Steps to Success (the book that Im reading), ready position enables you to move as quickly as possible for actions (Grice 3). In badminton, a 1- shot rally between you and your opponent is usually under 1 second. Thats why you need to have a good ready position so that you can act fast. So here is the correct description of a good ready position:
- Your feet are spread about shoulder width apart with you knees lightly bent. (3)
- Your feet are square or slightly staggered with the dominant slightly forward of the non-dominant foot. (3)
- Hold the racket in basic grip.
Here is the visual example of the correct ready position.

Foot Movement in Badminton
There are four types of movement in badminton: step- close, shuffle, Sashay, and three- step sequence (Grice 4). Each type is applied for different types of shots. Or it could be used depend on the position which you are staying at on the court. Good movement will dramatically improve your game. Believe me, in badminton, although you have a perfect stroke, terrible movement could shut you down in a match. Here are the demonstrations of good movement in badminton.
I. Step- close: this step is the 2nd most common in the movement. It is used for high forehand stroke (lob, smash...). This step is applicable for 75% the surface of the badminton court (except the bottom left corner). Here is the instruction
1. Start with ready position, dominant foot is always the pivot and the non- dominant (non- racket) is the leader (Grice 4)


2. Turn you body to 45 degree angle to the right, at the same time, open your right foot so that the gap between feet is equal to your shoulder length.


3. Move your left foot back so that your feet will be parallel to the net, with your face faces toward the net, back to ready position


II. Shuffle: this is the most common step in badminton. It could be applied to every single high strokes for both forehand and backhand. This could be used in the whole court. This is also the easiest one.
1. Start from ready position.

2. Simply shuffle by your racket foot (if you are left- handed, that is left foot) toward the the place you want to go


III. Sashay step: this step is used for on the net play, usually for forehand net-play. This step provides stability and flexibility for the player, help them to control the shot better.
1. Start from ready position.

2. Move your racket foot toward the net for a 45 degree angle.

3. Scissoring your other foot so that your feet will look like this.

4. Repeat step 2.
 IV. Three- step sequence: this step allow you to move further and faster (Grice 7). It also allow you to recover faster to return the opponents stroke. This step is used to move from backhand net to the its straight line til the end of the court. Here is the instruction.
1. Start from back- hand net play position.

2. Move your racket foot backward so that your front side will face the net.

* The racket foot has to be behind the non- racket foot for a shoulder length.
3. Repeat step 1

* This time, your front side will form a line that will intersect the net at a 45 degree angle.
4. Return to ready position

Question: Which movement (footstep) is the best fit for you?
MLA Citation:
Jerby. "Thread: Stance When Receiving Server (doubles)." Badminton Central Discussion Forums RSS. Badminton Central, 12 Aug. 2009. Web. 31 Dec. 2014.
Grice, Tony. Badminton: Steps to Success. Champaign, IL: Human Kinetics, 1996. Print.

2. Simply shuffle by your racket foot (if you are left- handed, that is left foot) toward the the place you want to go

Then..

Finished by...

III. Sashay step: this step is used for on the net play, usually for forehand net-play. This step provides stability and flexibility for the player, help them to control the shot better.
1. Start from ready position.

2. Move your racket foot toward the net for a 45 degree angle.

3. Scissoring your other foot so that your feet will look like this.

4. Repeat step 2.

1. Start from back- hand net play position.

2. Move your racket foot backward so that your front side will face the net.

* The racket foot has to be behind the non- racket foot for a shoulder length.
3. Repeat step 1

* This time, your front side will form a line that will intersect the net at a 45 degree angle.
4. Return to ready position

Question: Which movement (footstep) is the best fit for you?
MLA Citation:
Jerby. "Thread: Stance When Receiving Server (doubles)." Badminton Central Discussion Forums RSS. Badminton Central, 12 Aug. 2009. Web. 31 Dec. 2014.
Grice, Tony. Badminton: Steps to Success. Champaign, IL: Human Kinetics, 1996. Print.